
First: check two settings
Download originals (with iCloud Photos)
If Optimize iPhone Storage is on, your iPhone only holds space-saving versions and the originals are in iCloud. Switch to Download and Keep Originals under Settings → [your name] → iCloud → Photos first and wait until everything has downloaded. Otherwise you only transfer the small versions.
Transfer format
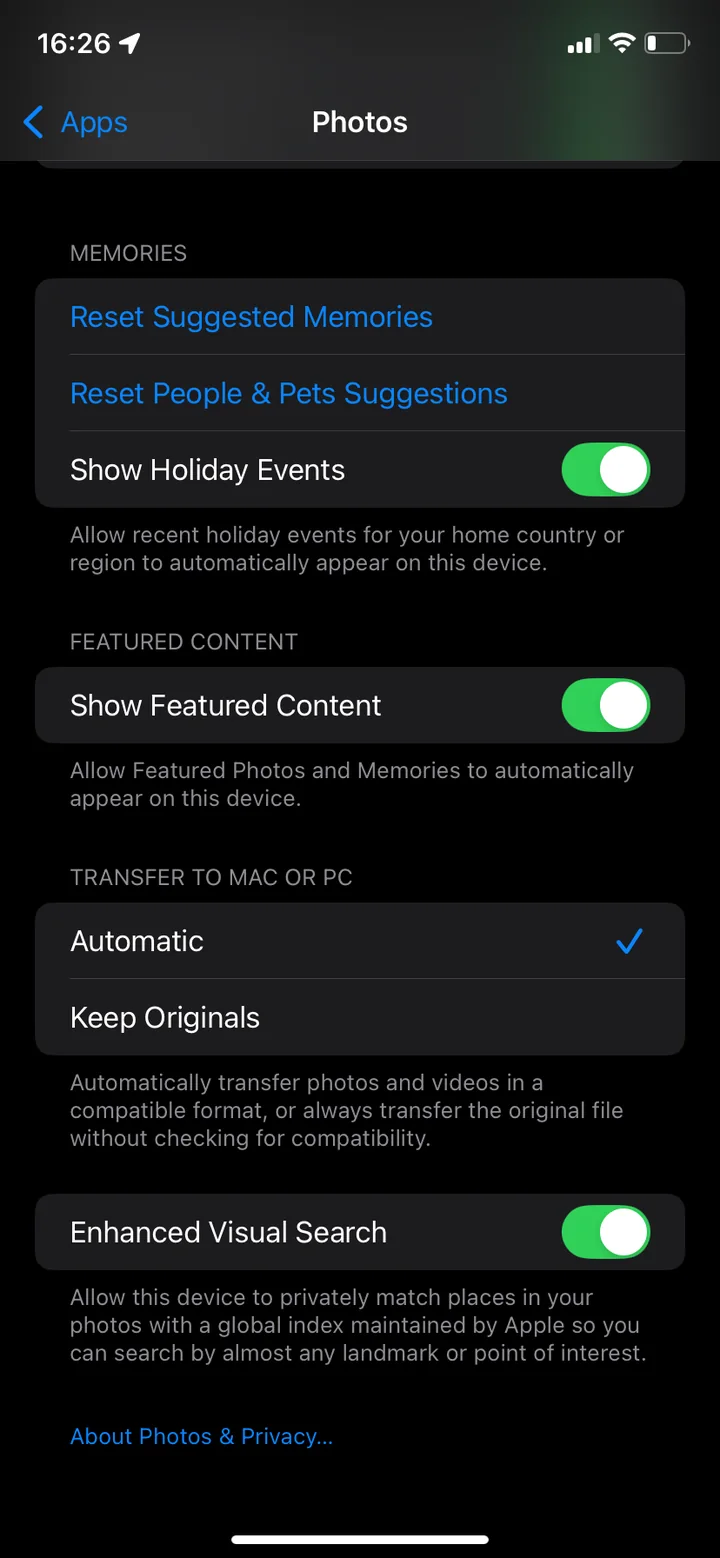
Your iPhone usually stores photos in the space-saving HEIF format (.heic). Under Settings → Apps → Photos, at the bottom, Transfer to Mac or PC decides what happens: Automatic converts photos to a compatible format such as JPEG, Keep Originals transfers them unchanged.
Copy to a folder with Image Capture
- Connect your iPhone to the Mac with a cable and unlock it. Tap Trust if asked.
- Open Image Capture on your Mac, for example via Spotlight.
- Select your iPhone under Devices in the sidebar.
- Choose a folder or an external drive under Import To at the bottom.
- Click Download All, or select individual photos and click Download.
Your photos are then stored as separate files in the folder, independent of iCloud. That is the safest copy before you delete anything on your iPhone.
Import with the Photos app on your Mac
- Connect your iPhone with a cable, click Allow on your Mac if asked and tap Trust on your iPhone.
- Open the Photos app on your Mac. If the Import screen doesn’t appear by itself, click your iPhone in the sidebar.
- Select the photos and click Import Selected or Import All New Items.
Important: if you use iCloud Photos on your iPhone and Mac, your photos are already in the Photos app, but synced. Delete on your iPhone and they disappear on your Mac too. For a real backup, export the originals to a folder via File → Export → Export Unmodified Original in Photos, or use Image Capture right away. More in How to delete photos from iCloud.
If the transfer to your Mac doesn’t work
If your iPhone doesn’t show up in Image Capture or the Photos app, these steps from Apple usually help:
- Unlock and confirm: Unlock your iPhone. Click Allow on your Mac if asked and tap Trust on your iPhone.
- Check the cable: If your iPhone doesn’t make a sound or vibrate when you connect it, unplug the cable and check the charging port for debris. Otherwise try a different cable that supports data transfer, not just charging.
- Try another port: Plug the cable into a different USB port or try another Mac.
- Update your software: Install the latest versions of macOS and iOS. Also check whether third-party VPN or security software is installed that may interfere with the connection.
If you tapped Don’t Trust by mistake, go to Settings → General → Transfer or Reset iPhone → Reset → Reset Location & Privacy on your iPhone. This resets your location and privacy settings. The next time you connect, your iPhone asks again whether you trust the computer.
Check and back up twice with Time Machine
Open the destination folder in Finder and compare the count with the Photos app on your iPhone. Spot-check a few videos, they are the most likely to be missing. If you use Time Machine with an external drive, the folder is included in the next backup automatically. Then your photos are in two places, and only then should you delete on your iPhone.
Now free up space on your iPhone
Your photos are safe, so you have a free hand on your iPhone. Start where the most space is: a few long videos often free up more than hundreds of photos. A cleanup app like PhotoDelete helps here: “Largest Files” (Pro) shows your photos and videos sorted by size. Go through the rest month by month with a swipe and keep only what you want with you on the go.
Afterwards: empty Recently Deleted
Deleted photos and videos stay in the Recently Deleted album for up to 30 days. Only when you empty it under Photos app → Collections → Recently Deleted → Select → Delete All is the storage on your iPhone freed.
Common mistakes
- Mistaking the Photos app with iCloud for a backup: it deletes along with your iPhone. Only separate file copies protect you.
- Forgetting hidden photos: the Hidden album is locked by default, and while it is locked Image Capture doesn’t transfer it. Turn off “Use Face ID” under Settings → Apps → Photos first and turn it back on afterwards.
- Importing only previews: with Optimize iPhone Storage, download the originals first.
- Deleting before checking: always verify first that everything arrived on your Mac.